After creating that near-perfect match using DeltaWave, wouldn’t it be nice to be able to compare the two files that are perfectly aligned in phase and level? Enter the Comparator. Comparator is a tool that allows you to run both, sighted, and blind audibility tests to determine if the two files have sufficient differences to be detected in playback.
Where is it?
Comparator is available from the Play menu on the main DeltaWave window. Two files must be loaded, and optionally aligned before invoking it. The two files can be loaded by pressing either Show or Match buttons.
Types of tests
Three test types are currently available:
- A/B/X style difference test to detect if two tracks have audible differences
- X/Y Stereo difference test to detect if two tracks have audible differences using stereo imaging
- X/Y Preference test to determine if you prefer the sound of one track over the other
All tests can be conducted sighted or blind. Blind test is the only way to conduct a proper test with statistically valid results. Therefore it is recommended that you use the sighted versions of the test to familiarize yourself with the test, and to see if you can detect the differences or determine preference while seeing an immediate result of the test. Once you are comfortable that you can do this while seeing the results, turn off Reval Results checkbox and conduct a proper test with at least 15 or more test trials. When done, turn on Reveal Results to see how you did.
Test Results publishing
DeltaWave adds a digital signature to a properly conducted blind test results. If you share these results with others, they will be able to validate that the results were produced using DeltaWave, with the set of files and settings you’ve used. To share the results, you’ll want to copy the entire contents of the Results window, including the signature, and then share it as a text file. While this can’t provide a 100% guarantee that someone didn’t cheat on the test, it does make it just a tiny bit harder to so.
ABX Comparison Test
ABX method of comparing audio files is a well-known, double-blind comparison method. The benefit of blind testing is the elimination of certain kind of biases. ABX allows the listener to focus on just the audio comparison, eliminating any possible expectation of differences that might be based on visual (or other, non-audio-based) recognition of the source of the audio track.
ABX consists of trying to compare a randomly chosen track (X) to tracks A or B, and to then decide if X track is A or B. If after a reasonable number of tests (15-20) the statistical result is much better than guessing, you can be fairly sure that there is an audible difference that was detectable between these files. To confirm this further, run a few tests, leave some time between them to make it easier on yourself, more relaxed. If the results are consistently much better than guessing, you can conclude that the difference is audible.
Please note that ABX can’t prove the negative, that the differences are not audible. But, it can help you decide if the change is easy to detect. If after a number of trials you still can’t get to a statistically significant result, you can assume that the difference is at least hard to detect, if not completely undetectable.
Play Controls
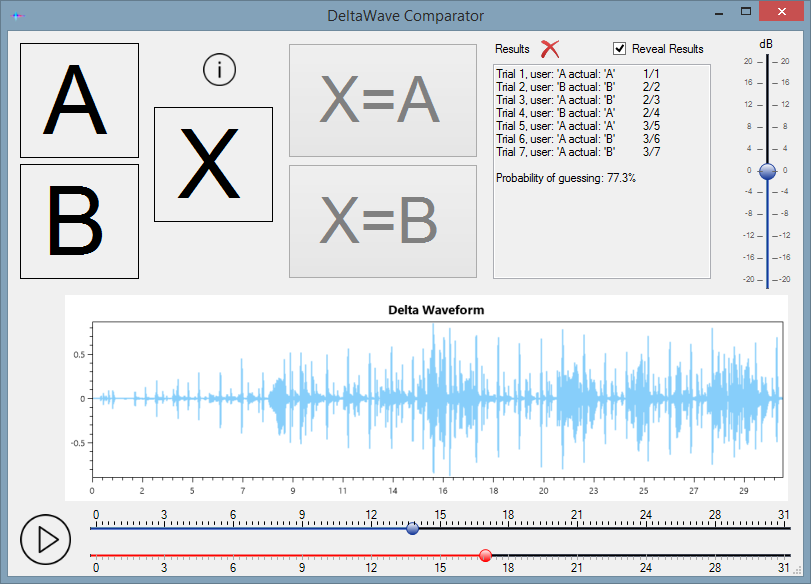
The main controls for ABX or AB-style comparison are the large buttons, A, B, and X. These buttons control which waveform is played back through the audio device selected on the main DeltaWave window.
- A will play the reference file
- B will play the comparison file
- X will play a randomly chosen A or B file
These buttons do not require a mouse click, simply moving a mouse over the large square will play the selected file. This allows a quick switch between two of them by simply moving the mouse back and forth.
The slider controls on the bottom allow you to select a portion of the track to focus on. This portion will be used for all comparisons and will be repeated as long as any of the play buttons are selected. The chart above is the Delta Waveform chart of the two files. This can give you an idea of where there are larger (level) differences between the two files, so you can try to narrow your selection to those areas, as there are likely to be more audible differences.
Volume
Volume control is the vertical slider on the right. This controls the playback volume of both files. No volume adjustment is applied when this is set to 0dB.
AB Comparison
A simple, non-blind A/B comparison is easy to do using the Comparator. Simply chose a section of the tracks (or the whole track) that you want to compare, set the volume to the desired level and then move the mouse between squares A and B to switch between tracks.
ABX Comparison
Some suggested steps to do an ABX-style comparison:
- Select the desired portion of the track to focus on, set comfortable volume level
- Familiarize yourself with the differences between the two files by doing a sighted A/B comparison, as described above
- If you can’t detect a difference while doing a visual A/B comparison, try to find another part of the track that might be more obviously different. Raise the volume a bit, as that might aid in detection
- Once you’re comfortable that you can tell the difference in a visual A/B test, it is time to begin ABX:
- Make sure Reveal Results checkbox is unchecked before you start, and clear the results box by clicking the red X button
- Move the mouse over the ‘X’ square and listen to this track. This is a randomly selected track from A or B.
- The goal is to determine if track X is the same as A, or B. If you can’t tell immediately, move the mouse to A or B square to compare these to X. You can quickly switch between X and A, X and B by moving the mouse back and forth between the appropriate squares
- Once comfortable that you know what track X is, press one of the two buttons to make your selection: X=A if you think X is track A, or X=B if you think X is track B
- Your result will be recorded in the result box, but you will not see if the choice was correct or not until you’re done with all the trials
- As soon as you record a result, Comparator will make another random pick, so you can continue the test by repeating steps 2-6.
- Repeat 15-20 times. This helps keep get a reasonable statistical result, while not being too tiring of a process
When finished with the desired number of trials, click on the Reveal Results checkbox. Comparator will show all the results and compute a percent statistic that shows whether or not the result is statistically significant. Often, a 5% or lower statistic is considered significant. If you want to be more strict, less than 1% is a good metric to strive for.
Because of the random nature of X track selection, too few trials can produce a result that looks good, but is not statistically valid. It is important to have a reasonable number of trials, and more than one test to demonstrate that the differences are truly detectable.
X/Y Stereo Difference Test
This test is designed to help determine if there are differences between the two tracks by playing them both, simultaneously, in each ear. If there are differences between the two tracks, this can result in slightly different stereo position and imaging than if the two tracks are exactly the same. The goal of the test is to detect if there are differences between left and right channel by listening to tracks where both channels are playing the same track, or by listening to tracks where both channels are playing different tracks.
Play Controls
The main controls for X/Y Stereo-style comparison are the large buttons, =, ≠, X, and L=R and L≠R. These buttons control which waveform is played back through the audio device selected on the main DeltaWave window and lets you make your choice when playing the random selection as to whether the two channels are the same or different.
- = will play the same track in Left and Right channels – these should sound exactly the same in both ears
- ≠ will play two different tracks, Reference in Left and Comparison in Right channels
- X will play a randomly chosen Left+Right combination, in some cases these will be same track in both channels, other times – different. Your choice to pick which one it is, the same or different
- L=R button records your decision that current X combination has the same left and right channel tracks, i.e., they sound the same
- L≠R button records the decision that current X has different left and right channels
Except for the last two, these buttons do not require a mouse click, simply moving a mouse over the large square will play the selected tracks. This allows a quick switch between two of them by simply moving the mouse back and forth.
The slider controls on the bottom allow you to select a portion of the track to focus on. This portion will be used for all comparisons and will be repeated as long as any of the play buttons are selected. The chart above is the Delta Waveform chart of the two files. This can give you an idea of where there are larger (level) differences between the two files, so you can try to narrow your selection to those areas, as there are likely to be more audible differences.
X/Y Stereo Difference
Some suggested steps to do an X/Y Stereo-style comparison:
- Select the desired portion of the track to focus on, set comfortable volume level
- Familiarize yourself with the differences between the two options, = and ≠ by doing a sighted comparison fist
- If you can’t detect a difference while doing a visual comparison, try to find another part of the track that might be more obviously different. Raise the volume a bit, as that might aid in detection
- Once you’re comfortable that you can tell the difference in a visual test, it is time to begin X/Y Difference test:
- Make sure Reveal Results checkbox is unchecked before you start, and clear the results box by clicking the red X button
- Move the mouse over the ‘X’ square and listen to this track. This is a randomly selected track that either has the same left and right tracks, or different
- The goal is to determine if track X is the same left and right tracks. If you can’t tell immediately, move the mouse to = or ≠ square to compare these to X. You can quickly switch between X and =, X and ≠ by moving the mouse back and forth between the appropriate squares
- Once comfortable that you know what track X is, press one of the two buttons to make your selection: L=R if you think X consists of the same track in left and right channels, or L≠R if you think X has two different tracks
- Your result will be recorded in the result box, but you will not see if the choice was correct or not until you’re done with all the trials
- As soon as you record a result, Comparator will make another random pick, so you can continue the test by repeating steps 2-6.
- Repeat 15-20 times. This helps keep get a reasonable statistical result, while not being too tiring of a process
When finished with the desired number of trials, click on the Reveal Results checkbox. Comparator will show all the results and compute a percent statistic that shows whether or not the result is statistically significant. Often, a 5% or lower statistic is considered significant. If you want to be more strict, less than 1% is a good metric to strive for.
Because of the random nature of X track selection, too few trials can produce a result that looks good, but is not statistically valid. It is important to have a reasonable number of trials, and possibly even more than one test to demonstrate that the differences are truly detectable.
X/Y Preference Test
This test is designed to help determine if you can hear and prefer the sound of the differences in one of the two tracks, A and B. As with the other tests, this can be conducted sighted, revealing results immediately for each trial, or blind. Blind is the proper test for determining statistically valid results, while sighted version can be used to acclimate yourself to how the test is conducted, and to do practice runs until you feel comfortable that you can tell the difference and prefer one of the two tracks.
Play Controls
The main controls for X/Y Preference-style comparison are the large buttons, A, B, and X. These buttons control which waveform is played back through the audio device selected on the main DeltaWave window.
- A will play the reference file
- B will play the comparison file
- X will play a randomly chosen A or B file
- ♥X will record your selection that you like track X
- 👎X will record your selection that you think track X sounds inferior
Except for the last two, these buttons do not require a mouse click, simply moving a mouse over the large square will play the selected file. This allows a quick switch between two of them by simply moving the mouse back and forth.
The slider controls on the bottom allow you to select a portion of the track to focus on. This portion will be used for all comparisons and will be repeated as long as any of the play buttons are selected. The chart above is the Delta Waveform chart of the two files. This can give you an idea of where there are larger (level) differences between the two files, so you can try to narrow your selection to those areas, as there are likely to be more audible differences.
X/Y Preference
Some suggested steps to do an X/Y Preference-style comparison:
- Select the desired portion of the track to focus on, set comfortable volume level
- Familiarize yourself with the differences between the two options, A and B by doing a sighted comparison fist
- If you can’t detect a difference while doing a visual comparison, try to find another part of the track that might be more obviously different. Raise the volume a bit, as that might aid in detection
- Once you’re comfortable that you can tell the difference in a visual test, it is time to begin X/Y Preference test:
- Make sure Reveal Results checkbox is unchecked before you start, and clear the results box by clicking the red X button
- Move the mouse over the ‘X’ square and listen to this track. This is a randomly selected track that will play Reference or Comparison tracks
- The goal is to determine if you like track X or not.
- Once comfortable that you if you like track X, press one of the two buttons to make your selection: ♥X if you prefer X, or 👎X if you think it sounds inferior
- Your result will be recorded in the result box, but you will not see the results until you’re done with all the trials
- As soon as you record a result, Comparator will make another random pick, so you can continue the test by repeating steps 2-6.
- Repeat 15-20 times. This helps keep get a reasonable statistical result, while not being too tiring of a process
When finished with the desired number of trials, click on the Reveal Results checkbox. Comparator will show all the results and compute a percent statistic that shows whether or not the result is statistically significant. Often, a 5% or lower statistic is considered significant. If you want to be more strict, less than 1% is a good metric to strive for. The result will also tell you if you prefer track A (Reference) or B (Comparison) and how many times you picked your preference correctly
Because of the random nature of X track selection, too few trials can produce a result that looks good, but is not statistically valid. It is important to have a reasonable number of trials, and possibly more than one test to demonstrate that the differences are truly detectable.